
Solana Frames: Minting a cNFT on Farcaster
What’s this Article About?
Decentralized social media marks a significant shift towards empowering users with greater privacy and control over their online data. Unlike traditional social media platforms, decentralized networks empower individuals to manage their social graphs and digital identities directly. Platforms like Farcaster are at the forefront, creating censorship-resistant networks that promote open, interoperable communication across various platforms. A key innovation within Farcaster is the introduction of frames — turning regular social media posts into fully-fledged applications — to enrich social experiences online.
This article will explore Farcaster and their recent Solana support. We’ll cover what Farcaster is, what frames are, and how to verify a Solana address. Then, we’ll go through a short tutorial on creating a frame that mints cNFT to a user’s verified Solana address using the Helius Mint API. Prior experience with TypeScript and Next.js is assumed for the tutorial.
What’s Farcaster?
Farcaster is a sufficiently decentralized social network that leverages the Ethereum network. It offers a public platform similar to popular social networks such as Twitter and Reddit, where users can create profiles, share posts (known as casts), and follow other users. What sets Farcaster apart is its emphasis on user ownership and portability — users own their accounts and relationships with others. They can move between different applications while maintaining their digital identity and social graph.
What are Frames?
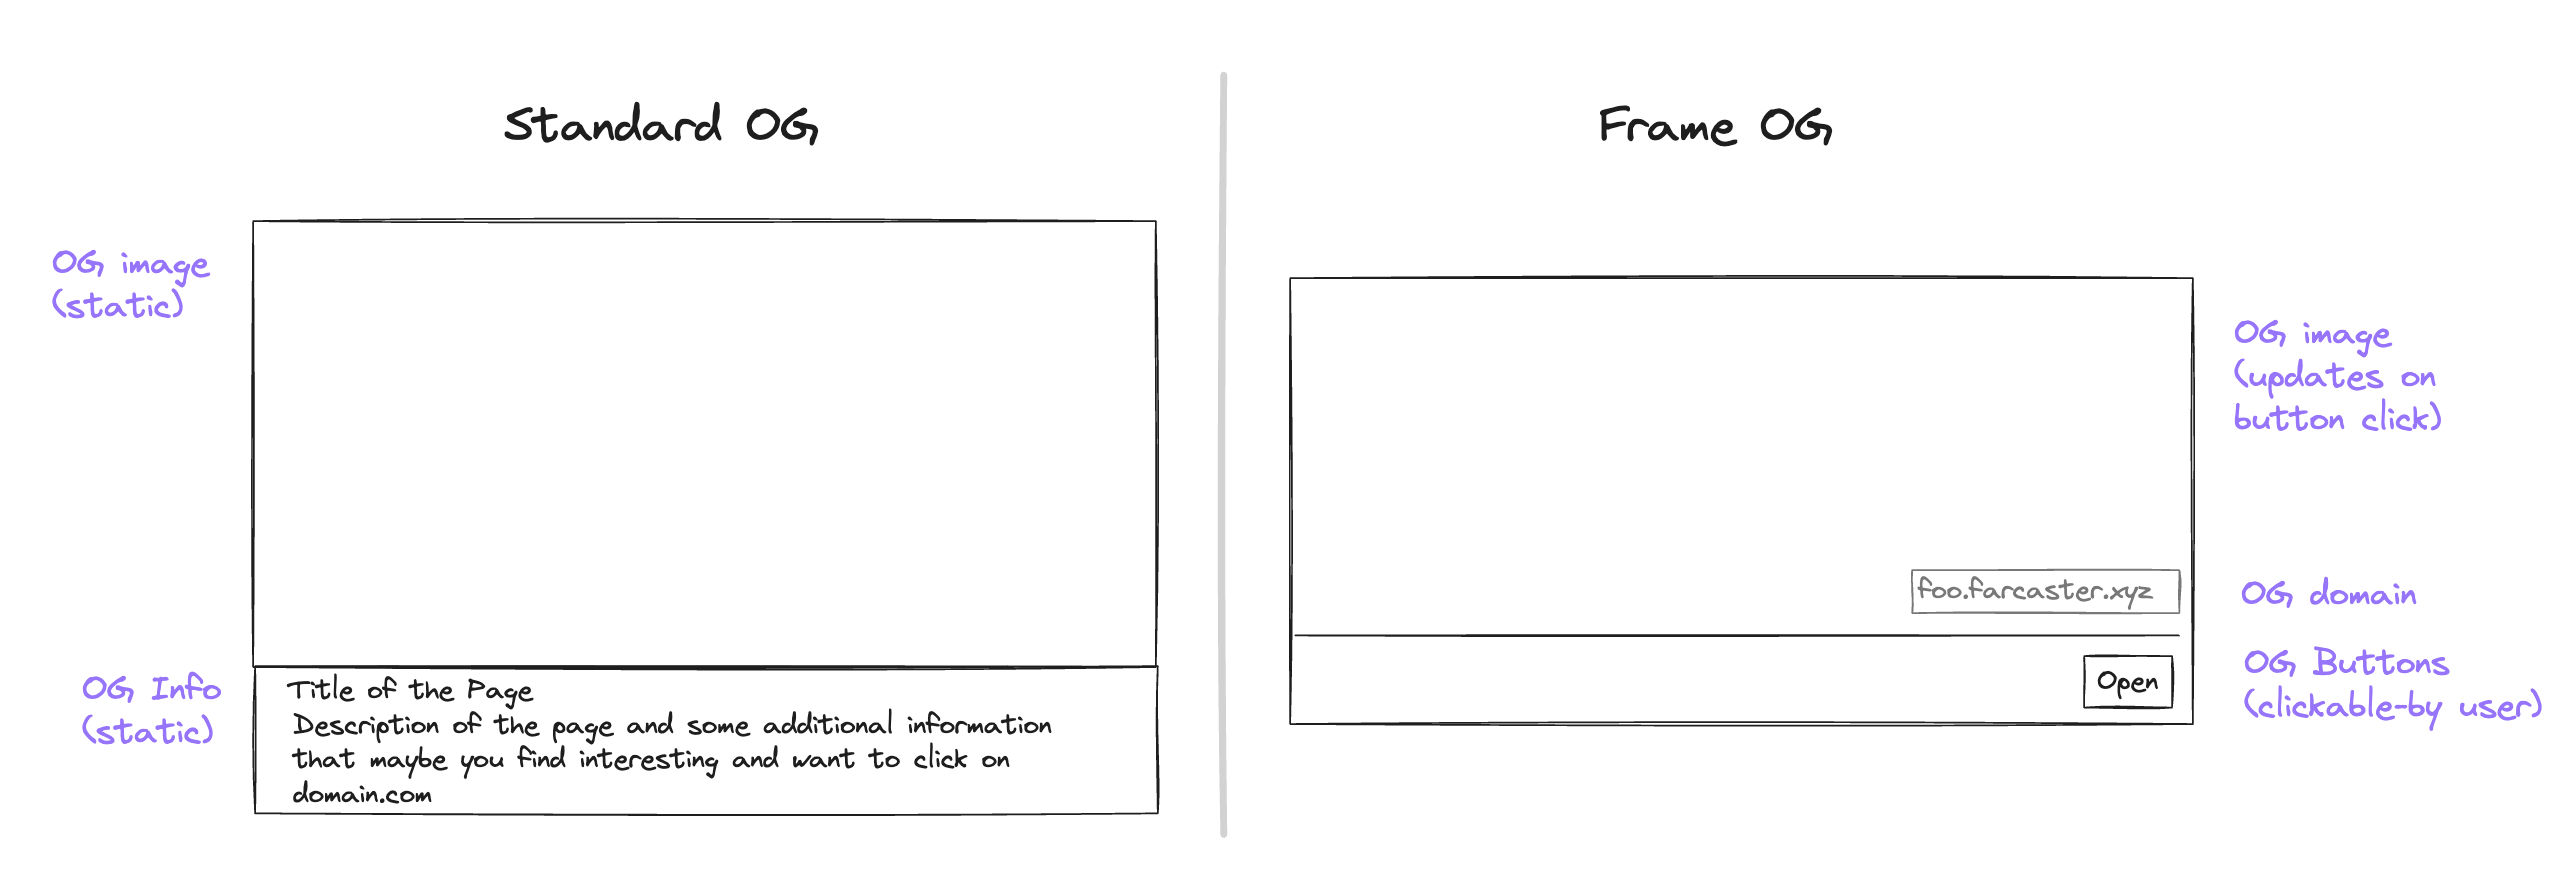
Frames empower developers to turn any cast into an interactive application. By extending the OpenGraph standard, they transform static embeds into dynamic, interactive experiences. This allows users to create features such as polls, live feeds, or interactive galleries within any Farcaster client, including Warpcaster. At its core, a frame is a set of <meta> tags returned with the <head> of an HTML page. Farcaster apps will render the page as a frame if the page contains all the required frame properties. The Frame Specification outlines these required properties. For example, an initial frame must:
- Return a valid frame in the HTML <head> section
- Return a valid HTML <body> in case the user clicks through to the frame in a browser
- Not include dynamic content in the initial frame since Farcaster clients cache it
- Not include an fc:frame:state tag
Verifying a Solana Address on Farcaster
Farcaster recently added support for Solana addresses. This means developers can build frames interacting with a user’s Solana wallet. In less than 24 hours since launching support, over 9328 unique Farcaster FIDs have verified a Solana address.
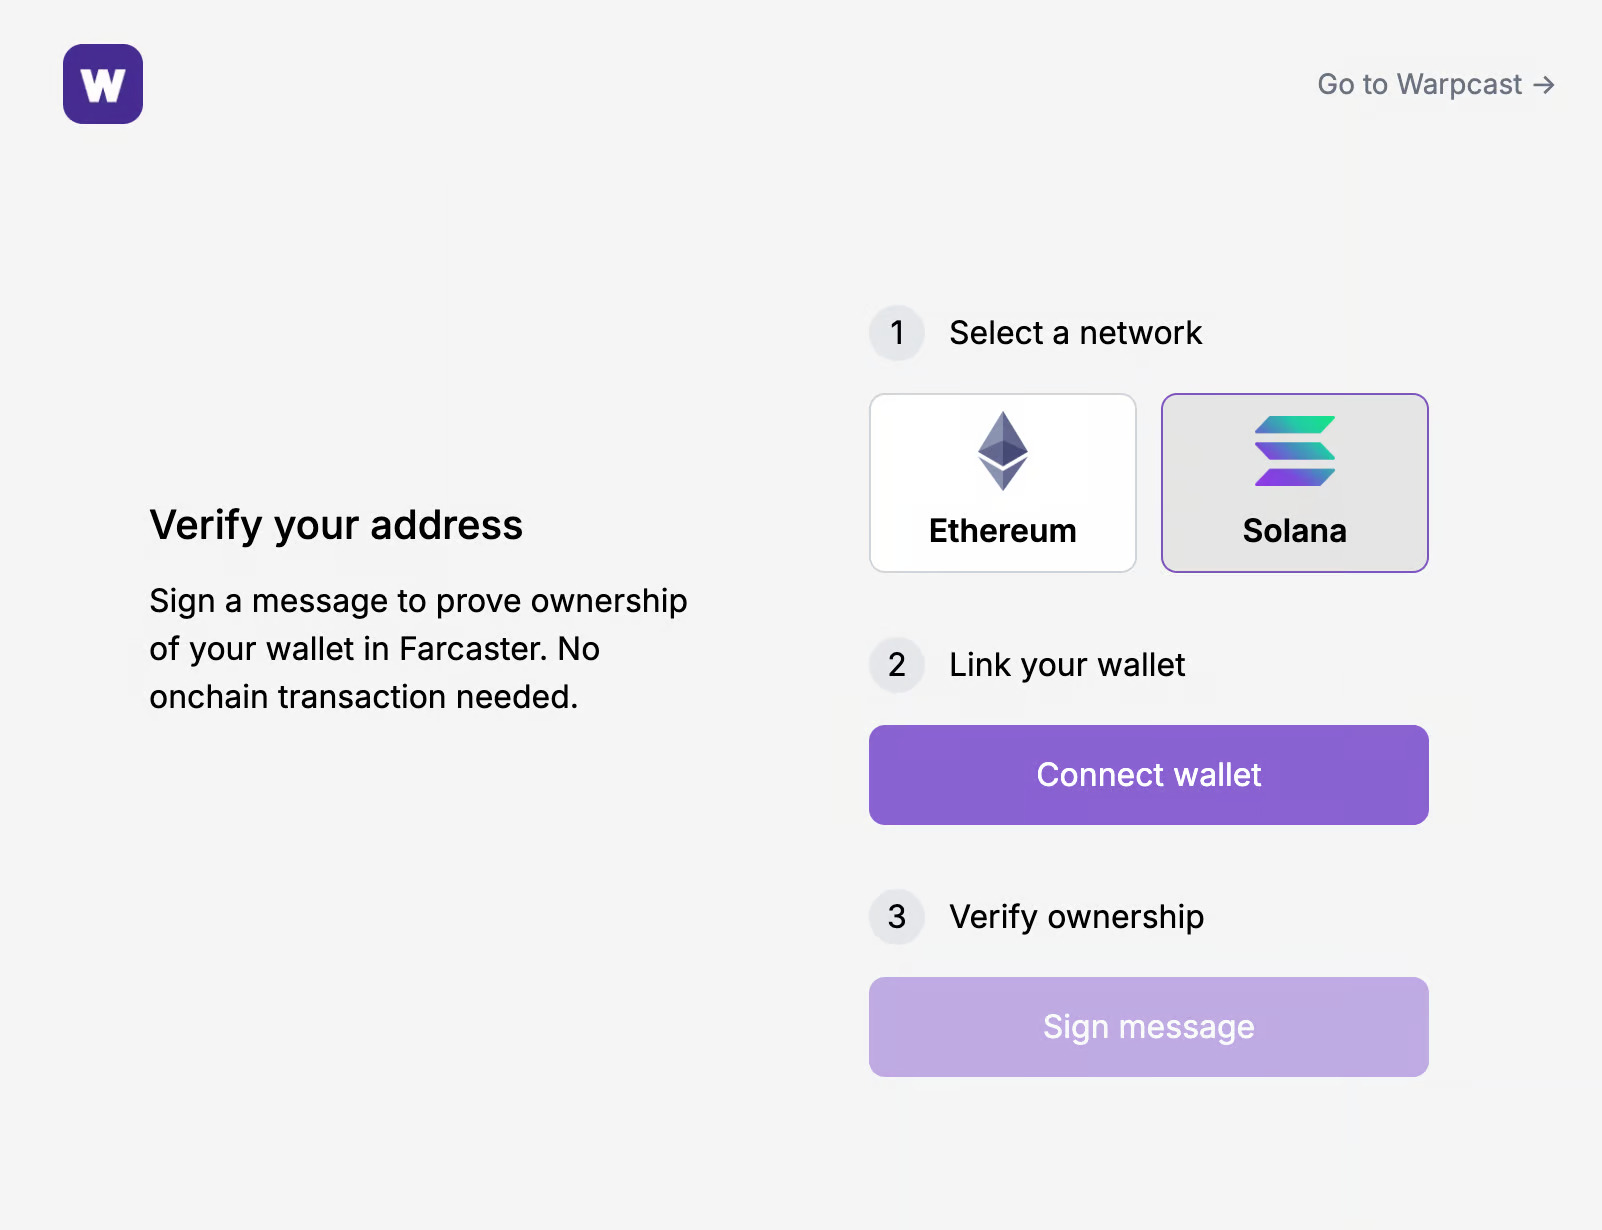
Users can verify their Solana address by:
- Navigating to Settings
- Clicking on Verified Addresses and clicking the “Verify an address” button
- Connecting their Solana wallet and signing a message to prove ownership
Note that the only wallet currently supported is Phantom.
Tutorial: Creating a Frame that Mints a cNFT
In this article, we’ll create a Frame that allows users with a verified Solana address to mint a compressed NFT (cNFT). We’ll bootstrap the project using frames.js, a Next.js template for building and debugging frames. We’ll use Coinbase’s OnchainKit, specifically the Frame Kit, to fetch a Farcaster user’s information when they interact with the frame. Then, we’ll feed this data into the Helius Mint API to mint the following cNFT to a user’s Solana wallet:

Setting Up Our Frame
Creating a frame with frame.js is as straightforward as cloning the starter template. Simply run the following command, replacing <name> with the name of the new folder you wish to clone the template into:
I’ve decided to name my directory helius-frame, so I’ve replaced <name> with <helius-frame>. Next, change into the new directory (e.g., cd helius-frame) and install the necessary dependencies via the yarn install command. Once the download is finished, run yarn dev to run the development server. Visit http://localhost:3000 in your browser to see the following:

By clicking on the Debug hyperlink, we’re taken to http://localhost:3000/debug:

This is helpful as we can test our frame locally without deploying it. For example, we can sign in to test buttons, impersonate other users, and mock hub state. Warpcaster also has an amazing Frame Validator tool to validate frames. Going forward, we’ll test using the Frame Validator tool purely out of personal preference.
Next, run yarn install to install the template’s relevant dependencies. We’ll also want to run yarn install @coinbase/onchainkit to install OnchainKit.
We’re going to rearrange the project’s folders as so:
- Delete the examples folder — while the examples provide valuable insight into building frames, they are unnecessary for what we want to do. Removing this folder reduces project bloat. However, I highly recommend looking through them for alternative ways to build common frames
- Create an api folder in the app directory. This step aligns with Next.js’s conventions for API routes by providing a clear distinction between our application’s frontend and backend. Then, move the frames folder (along with its contents — route.ts) into the new api folder.
- Create a utils folder in the app directory. In this new folder, create a mint.ts file — this is where we’ll put our cNFT minting logic
We can now finally start building our frame!
Editing Our Frame
layout.tsx
We’ll start with the layout.tsx file. Delete all of its contents and replace it with the following code:
The RootLayout component takes a minimalistic approach to wrap the entire application with a consistent layout structure. It is flexible and designed to be reusable. By starting with this minimalistic layout, developers can use this file as a template to build and customize their own frames as needed.
Note that by altering the layout.tsx file, you’ll run into issues with using the debugger locally. Editing layout.tsx is not mandatory. However, we do so to introduce the application’s metadata in page.tsx. You could introduce the metadata in this file as a workaround.
page.tsx
Delete the contents of page.tsx and replace it with the following:
The code above sets up our initial frame, which will live at a URL on a web server. In my case, the initial frame is hosted on Vercel at https://helius-frame.vercel.app/ — we’ll go over how to deploy with Vercel later in this tutorial.
First, we import the Metadata type from Next.js for typing the metadata export in this file. We also import getFrameMetadata from @coinbase/onchainkit. We then define the base URL of the application to reduce repetitive code.
We then call getFrameMetadata to configure the metadata for our initial frame. This metadata includes:
- An image (i.e., src) that serves as a visual element for the frame, with an aspect ratio of 1:1
- A button labeled “Click to mint a cNFT on Solana!” that, when clicked, triggers a POST request to the specified postUrl (i.e., ${baseURL}api/frames). This action initiates the minting process
We then export a metadata object that includes the title and description of the page, OpenGraph metadata (i.e., openGraph), and the previously defined frameMetadata spread into the other property.
Lastly, page defines and exports the default page component. We return a basic h1 that says to mint a cNFT. This is because Farcaster requires us to return some HTML — the primary interaction is managed through frames rather than directly accessing the site itself. However, if a user clicks through, something still needs to exist on the site.
mint.ts
Paste the following code in mint.ts:
The mintCompressedNFT utility function is crucial to our application as it mints a predefined cNFT to a specified address. We’re using the Helius Mint API to create a simple, reusable, and asynchronous function that encapsulates the cNFT minting process. We must request our Helius General RPC URL, defined as url. If you don’t already have one, visit dev.helius.xyz to generate a free RPC URL to use for url. Note that my repository uses my SecureRPC URL — be careful about leaking your API key, and consider running a proxy. Regarding the request itself, a full breakdown of the request’s schema can be found here. Also note that I’ve already uploaded the image for the cNFT to ShdwDrive as, at the time of writing, Farcaster has not added full transaction support yet — the Helius Mint API handles uploading off-chain metadata to Arweave so long as a signer is provided.
The function also includes robust error handling to ensure that any issues during the minting process are caught and reported. It also logs the response data for debugging purposes.
route.ts
In api/frames/route.ts, paste the following code:
This file is a Next.js API route that handles all POST requests for our frame. The file starts by importing NextRequest and NextResponse from next/server for handling incoming requests and sending responses. We also import getFrameMessage and getFrameHtmlResponse from @coinbase/onchainkit/frame to validate frame messages and generate HTML responses for frame interactions. We also import our mintCompressedNFT utility function.
baseURL is defined to reduce code repetition. It’s used to construct paths for resources and API endpoints.
The file exports the POST function, which parses the incoming request body to extract the frame message. We use getFrameMessage to check whether the incoming frame interaction and the message’s payload are valid. We pass in the request’s body as JSON and the default Neynar API key (i.e., “NEYNAR_ONCHAIN_KIT”) to do this. Neynar is a developer platform aimed at simplifying Farcaster development. getFrameMessage returns a Promise that resolves to a FrameValidationResponse. It is defined as:
Thus, if the frame interaction is valid, it returns the message of type FrameValidationData. It is defined as:
This is invaluable as it includes relevant data such as the user’s Farcaster ID, whether they have any verified Ethereum or Solana addresses, and whether they’ve liked the cast. In this tutorial, we want to check whether the user trying to mint is following my profile. If they are, then we’ll allow them to mint the cNFT. We also want to ensure they have a verified Solana address to which we can mint the cNFT.
First, we check whether the interaction is valid and if the user follows my account. If not, they’re met with an error message and a button that prompts them to try again. We then check if the user has a verified Solana address. If an address, or addresses, are present, we proceed with the minting process. We take the first verified Solana address and pass it into mintCompressedNFT. If successful, we return a successful image and a link to view the cNFT on XRAY. We log the error on failure and respond with a message that prompts the user to try again. If no verified Solana addresses are found, we respond with an error message indicating the lack of a verified Solana address and prompt the user to retry. Lastly, if the frame message is invalid, we respond with an error message about the invalid frame and prompt the user to try again.
The code uses getFrameHtmlResponse to generate HTML responses tailored to the specific outcomes of the minting process or validation checks. This includes setting the responses’ images, aspect ratios, and buttons for specific user interactions.
Pushing to Production
With the code out of the way, create a new GitHub repository and push the code to the new repository. Execute the following commands in your command line to push the code to GitHub:
After pushing the code to GitHub, the next step is to deploy the application. Vercel offers a seamless integration with GitHub, simplifying the entire deployment process, so we’ll use them. To proceed:
- Sign into your account on Vercel’s website. If you don’t have an account, you’ll need to create one — they have a generous Hobby tier (i.e., free), which will suffice for our purposes
- Once logged in, navigate to the dashboard and click the New Project button. Vercel will prompt you to import a project from your GitHub. Select the repository you’ve just created in the previous step
- Vercel will automatically detect the framework you’re using and will suggest build settings. Vercel is made by the creators of Next.js and has first-class support, so we don’t need to worry much about an arduous configuration setup
- After configuring the project’s settings, click the Deploy button. Vercel will automatically begin the deployment process, building and deploying the project to a unique Vercel URL.
- Once deployed, Vercel will provide you with this unique URL to access the live application. My project was built to https://helius-frame.vercel.app/ — the GitHub repository name followed by the .vercel.app. Vercel also supports custom domain configurations in the project settings
That’s it! Following these steps, we’ve pushed our Farcaster frame to GitHub and hosted it on Vercel. You can test the frame’s functionality using the aforementioned testing tools, such as the Frames validator. The only thing left is to make a cast with the frame's URL!
Conclusion
The intersection of blockchains and social media is a significant leap forward in how we conceive of and interact within digital spaces. The popularity of Farcaster and frames transforms what were once static posts on traditional social media platforms into interactive experiences. This article explores Farcaster and frames. The tutorial provided is an introduction to leveraging Farcaster’s recent Solana support to mint cNFTs to users with the click of a single button. Whether you’re a developer looking to build on Farcaster, or someone interested in browsing their social media feed in a new and exciting way, the possibilities are endless.
If you’ve read this far, thank you, anon! If you’re looking to join Farcaster, use the following invite link! Be sure to enter your email address below so you’ll never miss an update about what’s new on Solana. Ready to dive deeper? Explore the latest articles on the Helius blog and continue your Solana journey, today.
