
A Guide to Testing Solana Programs
Introduction
Testing in a blockchain environment transcends the traditional software testing paradigm, introducing unique challenges and heightened consequences. With Solana’s high-throughput, low-latency environment, the margin of error is narrow. Automated testing becomes not just a best practice but a fundamental necessity to ensure the reliability and security of programs that operate in Solana’s dynamic and unforgiving environment.
This article explores the core types of automated testing — Unit Testing, Integration Testing, and End-to-End (E2E) Testing. It also explores writing basic unit tests in JavaScript/TypeScript and Rust before analyzing popular Solana testing frameworks. The article ends with a practical example that tests a “King of the Hill” game program.
Note this article assumes knowledge of Solana’s programming model and program development. This article will not go through the process of building a program or Solana-specific concepts — we are focusing on learning how to test Solana programs. If you’re new to Solana, I recommend that you read these previous blog posts first:
- The Solana Programming Model: An Introduction to Developing on Solana
- An Introduction to Anchor: A Beginner’s Guide to Building Solana Programs
This article also complements our previous article on Solana program security. I recommend reading the two in tandem.
What is Testing?
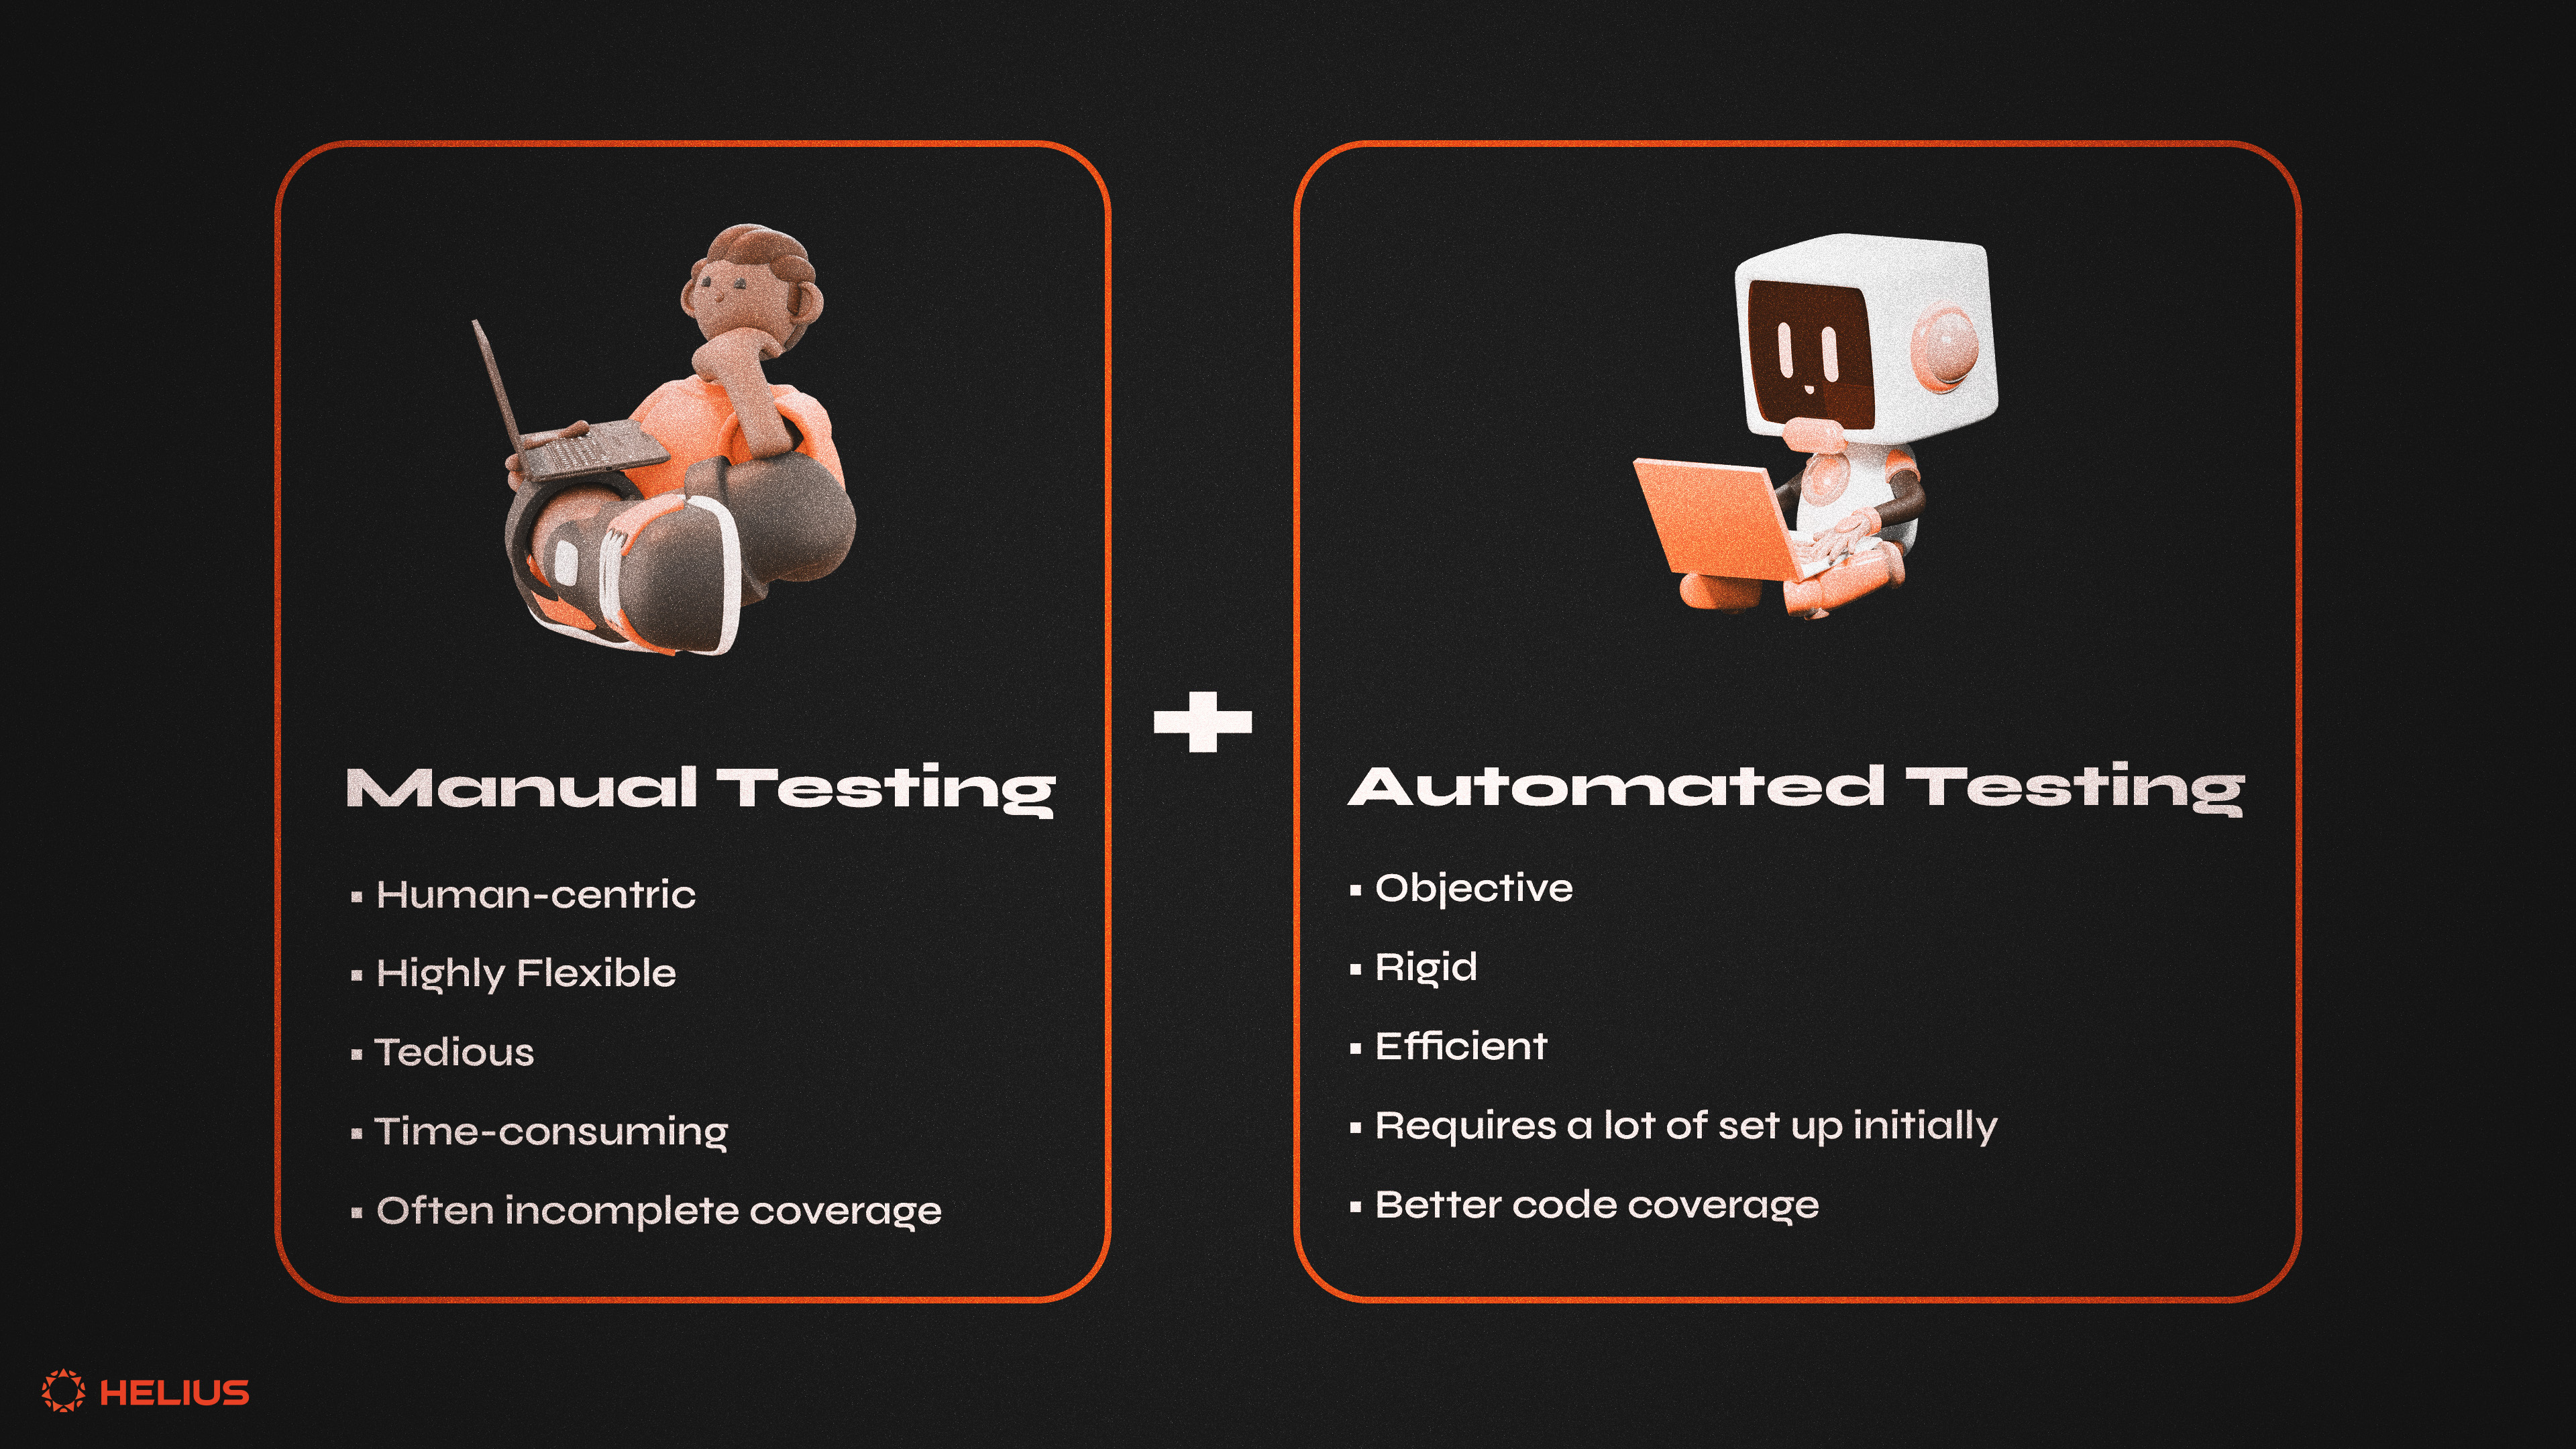
Testing is done to verify a piece of code, or an entire application, works as intended. There are two general types of testing:
- Manual Testing: a human-centric process where test cases are executed by developers, quality assurance analysts, penetration testers, or whoever else is in charge
- Automated Testing: a code-focused process where scripts are written to execute pre-defined test cases programmatically
Manual testing is a highly flexible process independent of the application type being tested. It’s well-suited for testing new features, usability, and accessibility. Manual testing relies on the tester’s intuition of how an application should behave. However, it is inherently slow, error-prone, time-consuming, and often incomplete (i.e., not all scenarios are covered) due to the lack of tools involved in the testing process.
Automated testing seeks to address the disadvantages of manual testing. For example, it is typically faster, especially if tests are executed in parallel. Automated testing is less prone to human error as it follows a pre-defined script. It increases test coverage due to its ability to handle a large number of test cases efficiently, making it a highly scalable solution. However, due to its rigid objectivity, automated testing is less accurate for tests that rely on human interaction, judgment, or critical reasoning.
For the purposes of this article, we focus on automated testing for our Solana programs, as it would be quite expensive to test them manually on mainnet and very time-consuming to test manually on devnet. However, manual and automated testing should be part of one’s testing process before shipping code to production. A robust testing process can minimize the amount of bugs introduced into production by identifying them earlier during development.
There are various types of automated testing, namely:
- Unit Testing
- Integration Testing
- End-to-End (E2E) Testing
Unit Testing
Unit testing is a process where the smallest functional units of code are tested to ensure they function correctly. Units are, ideally, the smallest possible building blocks of a program (e.g., individual functions, modules) that make up the finished product when combined. The core idea is that the overall program should work as intended if we thoroughly test its building blocks.
Unit testing is foundational to Solana development as it ensures each part of a given program behaves as intended. The reusability of these tests ensures new features or updates adhere to the project’s specifications and user expectations as defined in the test case. Because of this, unit testing inherently encourages code optimization and refactoring so new improvements do not adversely affect the program’s functionality. Not only does unit testing guarantee that each code segment performs correctly under the various test conditions, but it also ensures efficient and secure blockchain interactions. Detecting bugs early via unit testing is crucial as it prevents potential vulnerabilities from making it to production.
Various testing frameworks help streamline unit testing by simplifying the process of simulating network conditions and managing program state, which we’ll see later in this article. Solana developers can achieve a high degree of code reliability and performance through unit testing.
Integration Testing
Integration testing moves beyond unit testing to examine how different units of a program work together. Verifying that a program’s functions and modules work together is crucial to Solana development, where program interactions are often complex and carry financial consequences. Integration testing aims to identify and resolve issues that are not readily apparent when units are tested individually but emerge when components interact. These issues could include data format mismatches, type inconsistencies, program dependencies, or problems with third-party APIs.
Within the context of Solana, where programs inherently interact with other programs, wallets, and oracles, integration testing verifies that these interactions occur as intended. Despite each unit functioning flawlessly, their combination could introduce unexpected behaviors or inefficiencies that emerge under these simulated conditions. Developers can use different testing frameworks to simulate different transaction flows and program interactions, mimicking real-world scenarios closely. For example, Bankrun is a robust, lightweight testing framework that allows developers to jump back and forth in time and dynamically set account data. These feats aren’t possible while using solana-test-validator. Integration testing is crucial to ensure a program is robust, reliable, and ready for the demands of Solana’s network conditions.
End-to-End (E2E) Testing
End-to-End (E2E) testing is the culmination of the testing process. It focuses on evaluating a program’s complete operational flow as it would occur in real-world scenarios. This testing methodology differs from unit and integration testing because it examines the program from the user’s perspective — all possible flows and features an end-user would encounter should work as intended.
E2E testing is essential to verify that a program meets its functional requirements and provides a seamless user experience. This testing phase helps to uncover issues that might not have been evident during unit or integration testing, such as transaction processing delays, problems with persisting state, compute unit optimizations, or unexpected network conditions. While E2E testing usually applies to testing an entire dApp, testing a program’s operational flows and verifying how a user’s transaction would interact with the various functions and modules is crucial to building a successful and secure program.
Combining These Testing Methodologies
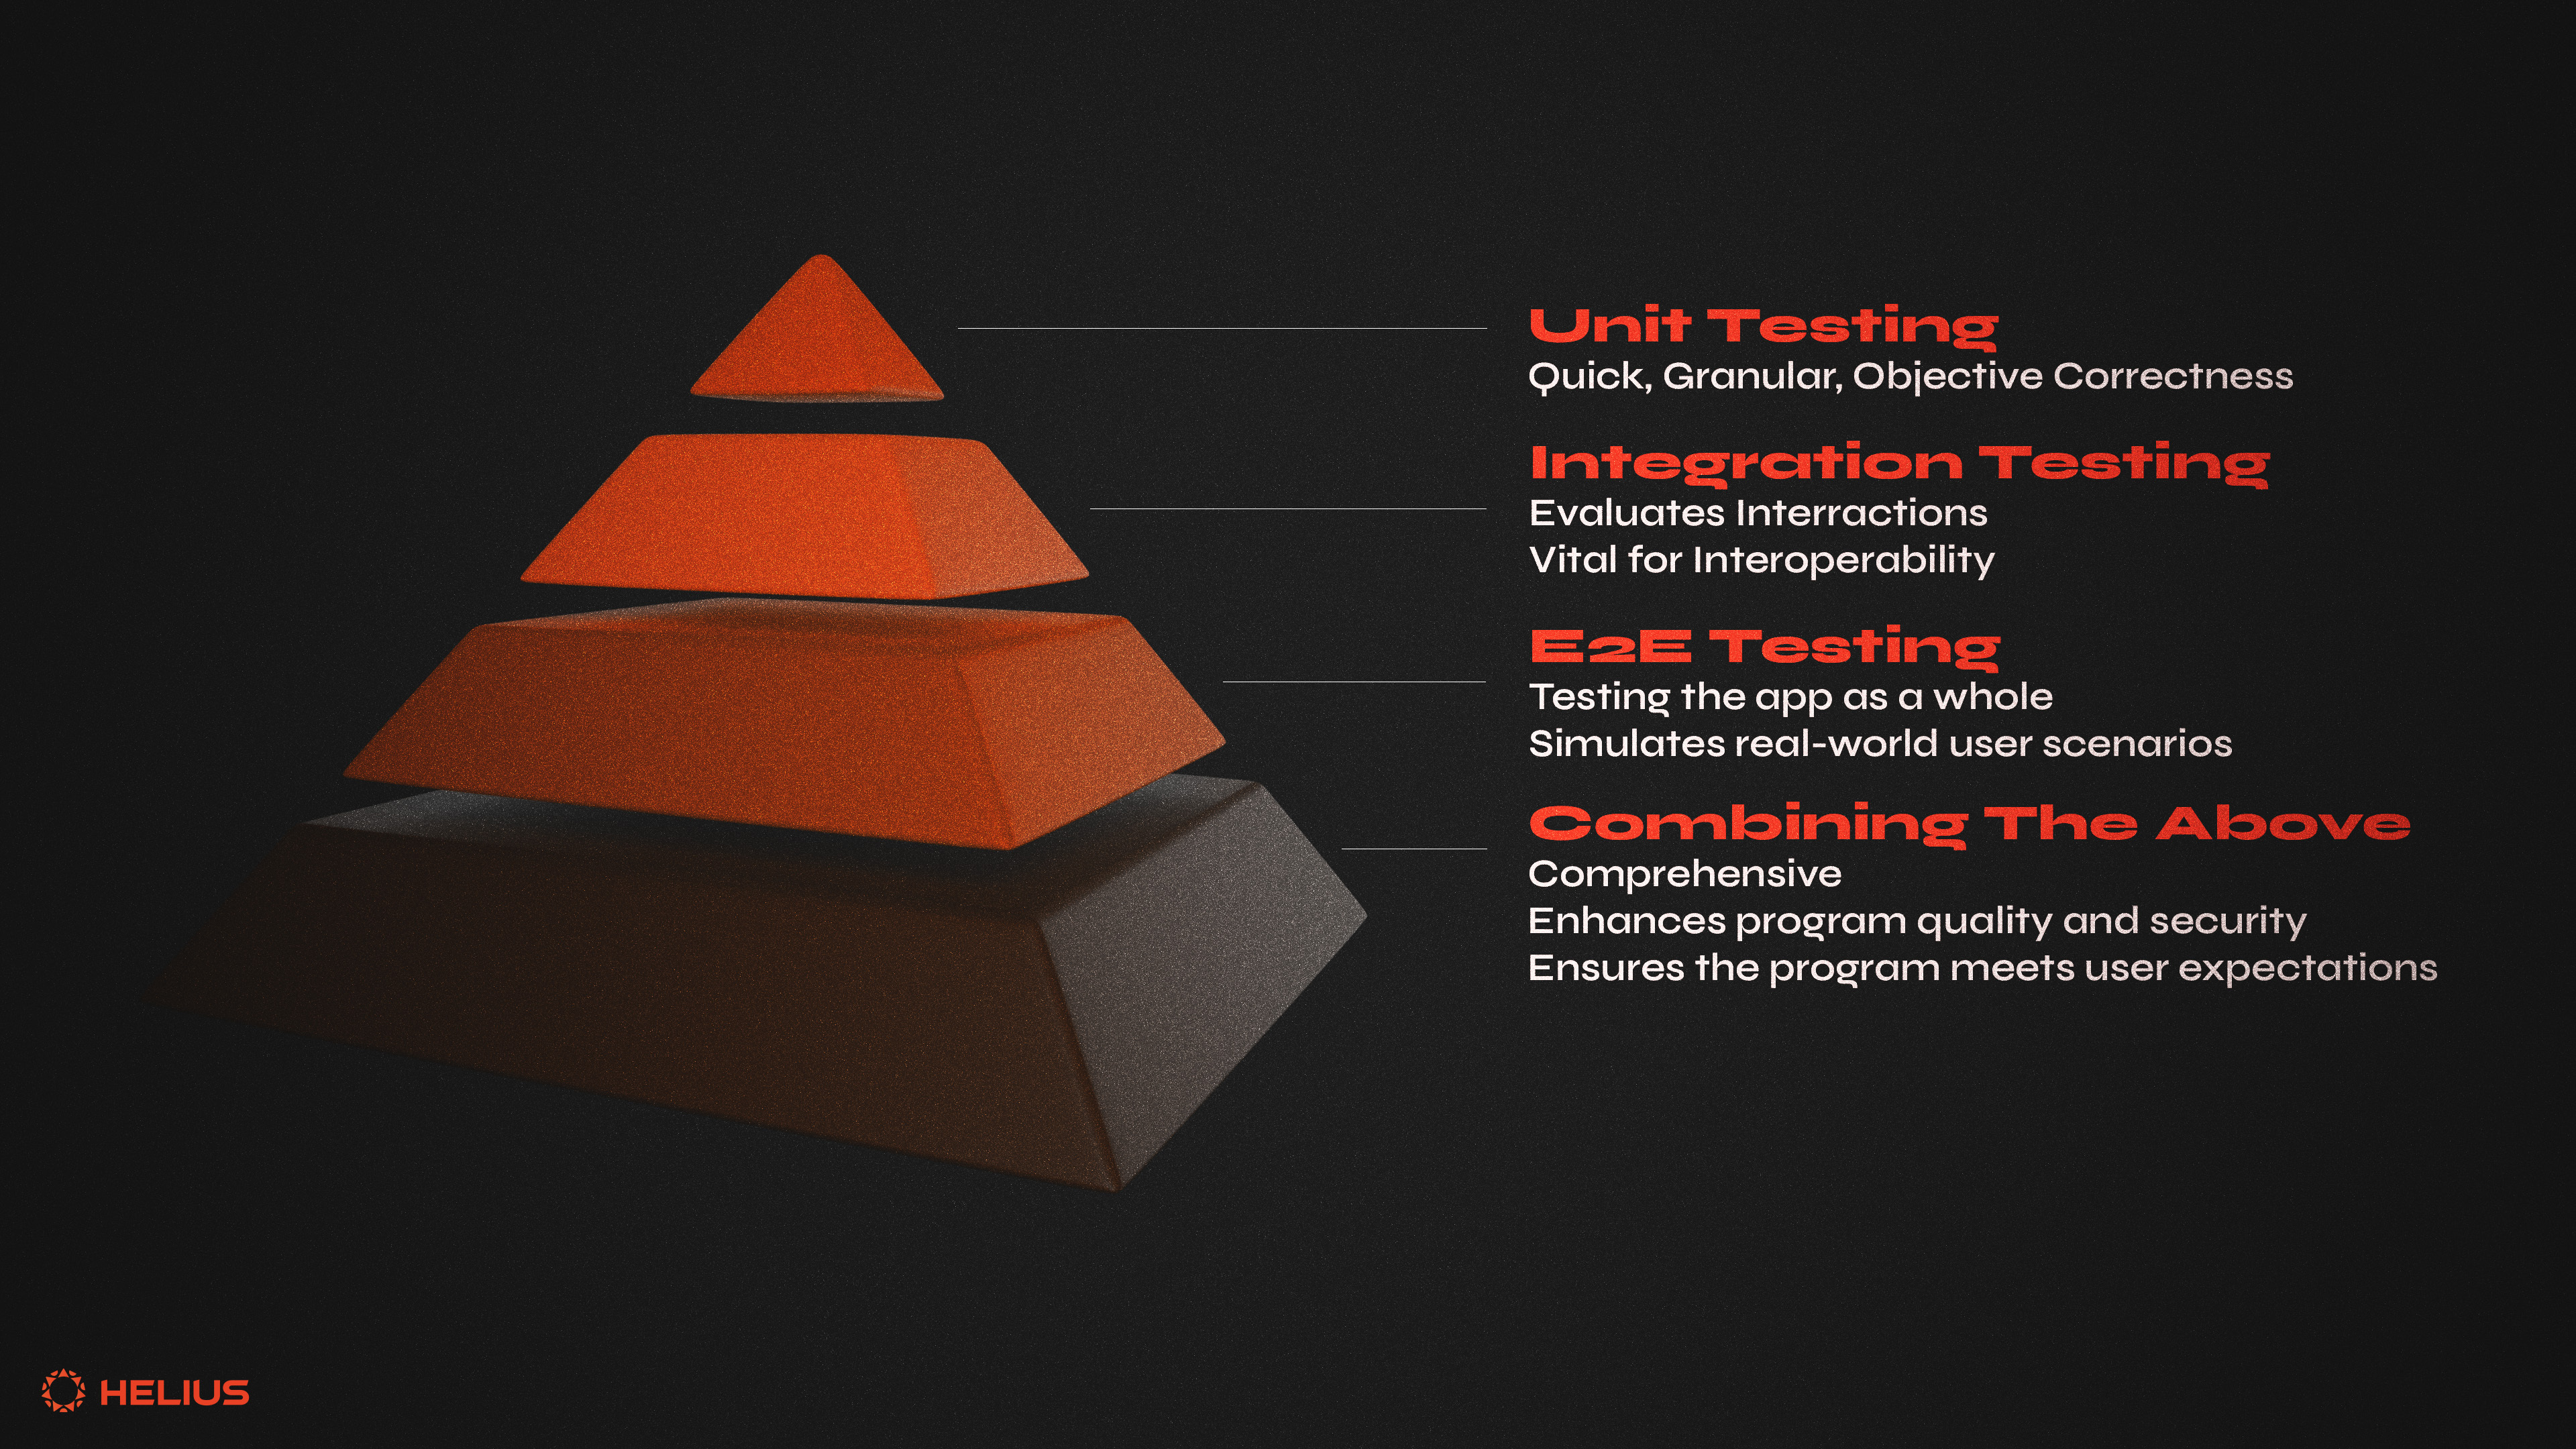
It is crucial to use a layered testing strategy and combine unit, integration, and E2E testing in your development process. Each testing methodology plays a distinct role in the development lifecycle, addressing different aspects of a program’s functionality and performance.
Unit testing is the foundation of a layered testing approach, allowing developers to quickly identify and resolve issues at the most granular code level. While it excels at ensuring the objective correctness of individual functions or modules, it fails to account for how these units work together or how they fit into the user’s experience.
Integration testing bridges this gap by evaluating how different units interact with each other to uncover issues that arise when integrating these components. However, this alone may not fully capture the end user’s experience or the program's behavior under real-world conditions.
E2E testing complements both unit and integration testing by simulating real-world user scenarios and testing applications as a whole. This approach is invaluable for assessing the overall user experience but fails to provide any granular insights needed to identify and resolve specific issues quickly.
By integrating these methodologies, developers can create a robust testing framework that covers the full spectrum of potential issues. Not only does a comprehensive approach enhance the quality and security of one’s program, but it also streamlines the development process. Developers can make informed decisions and revisions quickly, confident that their changes will be vetted on multiple levels. Combining these methodologies is crucial to ensure a Solana program is technically sound and aligns with user expectations under real-world conditions before deployment.
Writing Good Tests
Writing effective tests is vital to developing reliable and secure Solana programs. The essence of what makes a good test lies in focusing on the behavior being tested rather than the framework used or the code’s implementation details. Developers can create an efficient testing strategy that enhances code quality by integrating the principles of Test-Driven Development (TDD), the Arrange-Act-Assert (AAA) pattern, and industry best practices.
Test-Driven Development (TDD)
TDD is a robust software development approach guided by writing tests. That is, the main idea is to write tests before writing the actual code. The TDD cycle typically involves three steps:
- Write a Failing Test: Development should begin by writing a test for the next bit of functionality a developer wants to add. The test will inevitably fail as the functionality it’s testing doesn’t exist yet
- Implement the Code: Developers should write the minimal amount of code needed for the test to pass. The goal here is speed and simplicity
- Refactor: Once the test passes, developers should refactor their code to improve its structure and clarity without changing its behavior. The passing test acts as a safety net against introducing any breaking changes. This step can include removing duplicate code, splitting methods into smaller units, re-arranging inheritance hierarchies, or making names self-documenting. In the context of Solana, this step could involve optimizing the amount of CUs requested for a given transaction, reducing the number of CPIs, or streamlining transaction flows.
While TDD isn’t necessary for building good Solana programs, developers should consider its philosophy — it promotes a meticulous approach to building programs, its iterative approach fosters a flexible and adaptive development process, and it aligns perfectly with the need for precision, security, and efficiency in developing programs. TDD encourages developers to write cleaner, more focused code optimized for Solana’s unique network and performance requirements (e.g., optimizing CUs).
The Arrange-Act-Assert (AAA) Pattern
The AAA pattern offers a simple yet powerful structure for writing clear, concise, and effective tests. At its core, it encourages a disciplined approach to writing tests that is broken up into three distinct phases:
- Arrange: Start by setting up the test environment and preparing any relevant inputs. This might involve generating accounts, simulating account balances, or preparing instructions. The goal is to create a controlled scenario that’ll mimic the conditions under which the behavior will be tested
- Act: Execute the behavior being tested. The focus here is on the action that triggers the behavior intended for testing. For example, what happens when I call function x passing in account y?
- Assert: Evaluate the outcome of the action against the expected result. This step is crucial to verifying whether the test passes or fails. Assertions can range from a simple value check to complex validations involving multiple state changes, for example. How these assertions are implemented ultimately depends on the framework or protocol used. Lighthouse is a program that provides assertion instructions that can be added to transactions to identify undesirable states, spoofed simulation results, or overspending, for example. We’ll explore the benefits and intricacies of Lighthouse more in-depth in a separate article.
The AAA pattern’s strength lies in its adaptability, making it useful for unit, integration, and E2E testing. For example:
- Unit Testing: A test for a given function might arrange by setting up the program’s state, act by invoking the function, and assert by checking the function’s return value or resulting state changes
- Integration Testing: Testing interactions between multiple programs may involve arranging the deployment of the programs and setting their initial states, acting by executing relevant transactions, and asserting by verifying the final state of each program involved
- E2E Testing: An E2E test of a program might arrange by setting up the program’s state, act by going through an entire expected user flow (e.g., create an account, create a proposal, vote on that proposal, end the voting phase for a proposal, etc.), and assert by checking the flow’s results with the expected results
The AAA pattern is crucial to program development. It enforces a behavior-centric approach to testing, which is necessary to test whether a program will act as intended. Tests structured around AAA are easier to understand and maintain as each step is clearly divided into setup, action, and verification steps. Moreover, AAA promotes the creation of independent, decoupled tests that focus on specific behaviors or interactions.
Industry Best Practices
Writing good tests isn’t specific to Solana development. We can take general learnings from software development and apply them to testing Solana programs, focusing on testing intended behaviors rather than being bogged down by implementation details.
For example, unit tests should generally target the public interface of a method, supplying specific arguments and verifying that the outcomes are expected. This approach ensures that unit tests remain valid even if the internal implementation of the method changes, so long as the behavior remains consistent. Within the context of Solana development, this means that changes to a program’s logic that do not affect the program’s external behavior should not require any refactoring.
Moreover, a common pitfall in writing unit tests is making them too reliant on the internal workings of the tested method. This includes expecting certain private methods to be called a specific number of times or be coded in a certain way. These tests are too fragile and are prone to failure with any code refactoring, even when the actual behavior of the tested method remains unchanged. Instead, the focus should be on the results and side effects of the method observed externally. This is where code coverage tools can be used to ensure tests are comprehensive without being overly dependent on internal mechanisms.
Adopting these best practices in Solana development enhances the robustness and adaptability of programs. Focusing on testing behaviors over implementation details allows for more resilient and maintainable code, which is essential when deploying code to a dynamic network environment like Solana. Taking this approach ensures changes in program logic won't necessitate extensive retesting and that the program is prepared for deployment.
Now, let’s start writing some tests.
Writing Basic Unit Tests
Unit Testing in Rust
Rust adopts a unique approach to unit testing, encouraging developers to place tests within the same files as their code. This is done through the tests module and is gated with the #[cfg(test)] attribute. The test attribute ensures that these tests are only compiled and run when explicitly testing the software with the cargo test command (i.e., it doesn’t run with the cargo build command). Developers can also opt to exclude tests from the regular test run with the #[ignore] attribute. This is useful for particularly slow tests and still allows these tests to be run when explicitly called via the cargo test -- --ignored command.
As an example, take the following Rust function:
Bubble sort is a type of sorting algorithm that repeatedly loops through elements of a list, comparing the current element with the one after it and swapping their values if necessary. If we wanted to test this function to ensure it works as intended, we could write the following tests:
This example shows how our tests module is annotated with the #[cfg(test)] attribute. Within the module, we import all public items from the parent module into the current test module’s scope with use super::*;. Then, we have several test cases where we assert what the sorted vectors should look like. Rust provides several macros for assertions, such as assert! for general truthiness, assert_eq! for equality, and assert_ne! for inequality checks. These assertions are the backbone of Rust’s testing strategy — they’re all you really need to start writing tests.
Using a very rudimentary example, imagine you have a function that determines whether an account has sufficient balance to pay for a given transaction:
This function takes in two arguments: the current balance of a given account and the expected transaction fee. It returns true if the account balance is sufficient to cover the transaction fee or false if otherwise. This could be tested quite easily with the following unit test:
In the first test, we assert that has_sufficient_balance returns true when the account balance is significantly higher than the transaction fee, indicating sufficient funds to cover the transaction. In the second test, we assert that has_sufficient_funds returns false when the account balance is lower than the transaction fee, indicating insufficient funds to cover the transaction.
Other Important Caveats for Testing in Rust
Rust has the #[should_panic] attribute to mark tests expected to panic under certain conditions. This is useful for testing error handling pathways and specifying expected panic messages:
Unlike many other languages, Rust allows the direct testing of private functions. This allows for more detailed unit testing as every aspect of the code’s functionality can be covered with unit tests.
Rust also supports more advanced test organization techniques:
- Nested Modules: For complex projects, tests can be organized into nested modules, allowing for a clear hierarchical structure that mirrors the project’s organization
- Result-based Tests: Rust supports the ability for tests to return a Result<(), E> type. This allows developers to use the ? operator within tests, allowing for more expressive error handling
Unit Testing in TypeScript with Mocha and Chai
TypeScript has emerged as a popular choice for testing programs with the complete dominance of Anchor as the lingua franca of Rust development on Solana. With the anchor init command, the Mocha testing framework and the Chai assertion library are initialized by default for new Anchor projects.
Mocha is a feature-rich JavaScript test framework that runs on Node.js. This makes asynchronous testing very straightforward. Mocha’s primary use in Solana development is to test the client-side logic of dApps and other blockchain interactions.
Chai is an assertion library that can be paired with any JavaScript testing framework, such as Mocha. It provides developers with a range of functions to express assertions in a readable style. Chai’s expect, should, and assert interfaces allow developers to write comprehensive tests that are intuitive to read and write. It uses language chains (i.e., chainable getters) with the expect and should interfaces to improve the readability of assertions. Thanks to Chai, writing expect({a: 1, b: 2}).to.not.have.any.keys(“c”, “d”); is a highly readable and valid assertion.
For example, if we create a hello_world project using the anchor init hello_world command, the following hello_world.ts test file is created in the hello_world/tests directory:
Let’s break down what this all means.
Mocha uses describe blocks to group tests and it functions to define test cases. This example adheres to the AAA pattern for a structured approach to testing:
- Arrange: Here, anchor.setProvider(anchor.AnchorProvider.env()); configures the Anchor client to use the environment’s default provider, typically pointing to a local Solana test validator. Then, the program const declaration initializes an instance of the program to be tested, allowing us to call its methods within its test
- Act: In our test case “Is initialized!”, we call the initialize method of our program and send the transaction
- Assert: In this test case, we log the transaction signature without providing an assertion. Typically, this stage is where we’d incorporate Chai for assertions. As a very rudimentary example, we could modify the default test code with an assertion such as expect(tx).to.be.a(“string”);. A more detailed test might retrieve and inspect the program’s state after initialization, asserting it matches the expected values
The combination of Mocha and Chai, alongside the AAA pattern configured by default in Anchor projects, offers a robust framework for testing programs. Solana developers can ensure programs function predictably and reliably by clearly arranging the testing environment, acting by invoking program methods, and asserting the outcomes.
For example, imagine you’re developing a program that allows users to deposit and withdraw SOL from a vault within the context of Solana. This is what a test written in TypeScript using Mocha and Chai might look like to ensure the deposit functionality works as expected:
This example tests a hypothetical depositSOL function, which handles depositing SOL to a vault. It asserts that the vault’s balance increases by the correct amount after the deposit. We use the function getVaultBalance, an assumed utility function that fetches the vault’s current balance.
Other Important Caveats for Testing in TypeScript with Mocha and Chai
TypeScript’s static type system can sometimes make writing tests a bit tricky, especially when dealing with complex or not well-defined types. Use type assertions to avoid type-related issues in your tests. However, ensure that these assertions don’t mask potential runtime errors that could arise due to incorrect types.
When mocking objects or functions in TypeScript, ensure the mocked entities adhere to the correct types. Libraries such as ts-sinon or ts-mockito can help create type-safe mocks so tests remain accurate and reflect the program’s real behavior.
Mocha provides the only and skip methods to run exclusive or skip specific tests. While this is nice to have during development, it’s easy to accidentally commit these to production, resulting in incomplete test runs. Always review tests for only or skip before pushing tests to production. Moreover, be cautious when using Mocha’s hooks (i.e., beforeEach, afterEach, before, after) with asynchronous code. Ensure promises are handled correctly using async/await, or call the done callback method to avoid unresolved promises or uninvoked callbacks.
When using Chai’s expect().to.deep.equal(), be aware of its behavior with objects that contain dynamically generated properties, like dates or random values. These properties can cause unexpected failures in tests expecting deep equality. Consider using Chai’s expect().to.include() for more targeted assertions wherever applicable.
Popular Solana Testing Frameworks
Bankrun
A bank oversees tracking client accounts, managing program execution, and maintaining the integrity and progression of Solana’s ledger. It is essentially a snapshot of the ledger at a given point in time, encapsulating the state resulting from the transactions of a specific block.
Bankrun is a lightweight, flexible testing framework written in Node.js for Solana programs. It emphasizes ease of use and speed, enabling developers to write and run tests against their programs quickly. The true value of Bankrun is that it is a testing framework that empowers developers to simulate and interact with Solana banks in a controlled, efficient environment. Bankrun streamlines the testing process by mirroring the dynamics of Solana banks without the overhead typically associated with setting up such an environment.
Bankrun’s design is underpinned by a lightweight BanksServer that mimics the behavior of an RPC node but with significantly enhanced performance and flexibility. Developers can interact with this server via the BanksClient. This client provides a comprehensive toolset with methods for retrieving account balances, transaction statuses, and simulating transactions. Notably, the tryProcessTransaction method allows transactions that are expected to fail to be processed without throwing any JavaScript errors. This enables developers to assert specific failure modes or log messages directly.
The Meta-DAO’s Futarchy GitHub repository is a great example of using Bankrun to test production-ready code.
Integrating with Anchor
It is very straightforward to integrate Bankrun with Anchor. Using startAnchor, developers can automatically deploy all programs within an Anchor workspace to the test environment. This ensures that tests accurately mirror the program’s behavior in a complete Solana environment. The Bankrun documentation provides the following code example:
The anchor-bankrun package is a powerful extension that enables Anchor and Bankrun by exporting a BankrunProvider class that can be used as a drop-in replacement for AnchorProvider during testing.
Writing Arbitrary Accounts with Bankrun
A standout feature of Bankrun is its capability to write arbitrary account data. This functionality allows developers to bypass the limitations of account states by offering an unprecedented degree of flexibility. For example, a developer can simulate an account holding a significant amount of USDC without possessing the USDC mint keypair. This is invaluable for testing as it eliminates the need to manipulate actual tokens, thereby streamlining the setup process for complex scenarios.
The Bankrun documentation provides a code example of an infinite USDC mint, showcasing this capability through the start function. The start function prepares the test environment by deploying programs and setting account data as specified.
Time-Travel
Another standalone feature is Bankrun’s ability to time travel (i.e., manipulate the concept of time for testing purposes). Being able to manipulate time allows developers to fast-forward or rewind the Solana cluster clock (i.e., the Clock sysvar) to simulate specific temporal conditions instantaneously. This capability is crucial for testing programs that operate on time-based logic, including vesting schedules, token locks, or any functionality triggered by reaching a particular point in time.
Time traveling is straightforward, thanks to the setClock method. This method allows developers to set the cluster’s current time to a predefined Unix timestamp, shifting the entire test environment to this past or future moment. Operations and transactions within the test continue as if the specified time were the current time, allowing for an accurate assessment of the program’s behavior under those conditions.
Here’s a very rudimentary example showing how to time travel with Bankrun:
Bankrun versus solana-test-validator
The choice between Bankrun and solana-test-validator largely hinges on the specific requirements of the test scenarios. Bankrun’s speed, flexibility, and specialized features make it the preferred choice for most development scenarios, especially those requiring rapid iteration or detailed simulation. However, solana-test-validator remains relevant for testing that depends on real-life validator behavior and using RPC methods that BanksServer does not support.
solana-program-test
The solana-program-test crate provides a Rust-based testing framework designed explicitly for Solana programs. This framework is centered around the BanksClient. It simulates a Solana bank’s operations, enabling developers to deploy, interact with, and assess the behavior of their programs under test conditions that mimic mainnet, similar to Bankrun. Complimenting the BanksClient is the ProgramTest struct, a utility for initializing the test environment. That is, it facilitates the development of specified programs and the setup of necessary accounts. Additional structs like BanksTransactionResultWithMetadata, InvokeContext, and ProgramTestContext offer rich insights and context for transactions processed during testing, enhancing the overall debugging and verification process.
To streamline local development and testing, solana-program-test automatically preloads several programs:
- SPL Token (and its 2022 version)
- SPL Memo (versions 1.0 and 3.0)
- SPL Associated Token Account
These preloaded programs provide a quicker and more focused testing setup as they do not need to worry about manually setting up these common programs.
The Marginfi GitHub repository has several great examples of implementing solana-program-test for production-ready code. Bonfida’s development guide also has a great walkthrough on writing integration tests using the solana-program-test framework.
solana-test-framework
solana-test-framework is an extension of solana-program-test developed by Halborn. It is designed to enrich the testing environment by extending BanksClient, RpcClient, ProgramTest, and ProgramTestContext with several convenience methods. Like Bankrun, the extensions to ProgramTestContext, for example, allow for advanced testing scenarios where developers can jump to specific timestamps and update oracle prices.
These extensions provide the following enhancements:
- Transaction Management: It simplifies the assembly, signing, and payment of transactions via transaction_from_instructions
- Account Deserialization: It facilitates the easy retrieval and deserialization of Anchor and Borsh accounts with get_account_with_anchor and get_account_with_borsh, respectively
- Account Creation and Program Deployment: It allows developers to set up their testing environment efficiently with functions like create_account, create_token_mint, create_token_account, and deploy_program.
solana-test-framework supports both external clusters and simulated runtime. It’s compatible with multiple versions of Solana and Anchor, including Solana versions 1.9 through 1.14 and corresponding Anchor versions for 1.9, 1.10, and 1.14.
Example Testing Scenario
The Program
Take the following program as an example:
This program implements a simple “King of the Hill” game on Solana. The game allows users to become the “king” by sending more SOL to the prize pool than the current king did. The SOL sent by the previous king is transferred back to them when a new king takes their place.
The program’s functionality is as follows:
- Initialize: This function sets up the game with an initial king (i.e., the first player to initialize the game) and an initial prize amount. The initial prize must be greater than zero. The function then transfers the initial prize from the initial king to a prize pool
- Become King: This function allows a new player to become a king by bidding more SOL than the current prize. It transfers the current prize to the outgoing king and updates the prize pool with the new king’s bid, making them the new king. This bid must be higher than the current prize
Writing Tests
We can test the King of the Hill game successfully with the following code:
Let’s break everything down.
First, we start with our imports and setting up our testing environment in Anchor. For this example, I am testing in TypeScript using Mocha and Chai on localhost:
We use describe to group our test cases. We also set up the client to use the local cluster; set the program correctly; initialize variables for the initial king, new king, game state PDA, and the prize pool PDA, respectively; and create a utility function to make airdropping easier:
Next, we use the before hook to set up and fund the initial king and the new king keypairs, as well as derive the PDAs for the game state and prize pool. This block will run once before the test cases, allowing us to simplify each case into the AAA pattern more clearly:
The first test case is very straightforward — we check whether our game initializes correctly. We arrange by funding the game state and prize pool PDAs so we can interact with them later and set the initial prize to 1 SOL. Then, we act by calling the initialize method with the initialPrize. For the accounts, we pass in the game state PDA, the initial king, the prize pool PDA, and the system program. The initial king is the signer for this action. After, we assert that the game state updated the king and prize correctly:
The next test case ensures that someone else can become king. It arranges by fetching the king’s initial balance and setting the new prize to 2 SOL. It acts by calling the becomeKing function and passing in the latest prize amount. For the accounts, we pass in the game state PDA, the current king’s public key, the new king as the payer, the prize pool PDA, and the system program. The new king is set as the signer. It asserts by checking whether the king receives the initial SOL they contributed to be king, as well as whether the game state has updated correctly:
In this testing scenario, we’ve examined the core functionalities of our King of the Hill program. Through unit testing, we validated the integrity of the program’s logic at a granular level. By testing the king changes correctly, we’ve further confirmed the program operates as intended under simulated real-world conditions. These tests underscore the importance of a comprehensive testing strategy in ensuring our King of the Hill program’s quality and functionality.
Conclusion
Testing is the cornerstone of developing secure, reliable, and efficient Solana programs. In this article, we’ve explored the importance of combining Unit, Integration, and E2E Testing to cover all bases in the program development life cycle. By integrating these methodologies and leveraging powerful testing frameworks like Bankrun, solana-program-test, and solana-test-framework, developers can significantly improve the quality of their Solana programs. As you continue your Solana developer journey, let the principles, practices, and examples examined herein guide you toward creating robust, efficient, and secure programs.
If you’ve read this far, thank you anon! Be sure to enter your email address below so you’ll never miss an update about what’s new on Solana. Ready to dive deeper? Explore the latest articles on the Helius blog and continue your Solana journey, today.
